[Overview: NetsPresso®] A Platform That Handles Everything from Model Optimization to Target Deployment

Jaehoon Lee
Technical Content Manager, Nota AI
AI Model Optimization: Why Models Won't Run on Hardware
The Chip Is Ready, but the Model Won't Deploy
If you have ever tried deploying an AI model onto your own chip, the following scenario will feel all too familiar.
A customer reaches out. "We tried loading our model, but it won't run." Upon investigation, the execution fails because a specific layer's operator is not supported by the target runtime. After painstakingly finding a workaround to port the model, the inference latency turns out to be three times the required specification.
Applying quantization causes accuracy to collapse, and optimizing the graph triggers new errors in other layers. To make matters worse, configuration values that worked yesterday no longer apply to a new model, and fragmented logs make it difficult to even pinpoint the problematic layer. The chip design is complete, performance has been validated, and samples are ready, yet every time a new customer model arrives, the process resets back to square one.
Every model has a different architecture, requires different operations, and demands a different optimization path. Ultimately, each new model deployment becomes another round of manual tuning. No matter how capable the chip is, there is no way to prove it to customers if the model cannot run on it.
This gap exists because chip design and model optimization are fundamentally different areas of expertise. In an environment where target devices have become increasingly diverse, there are limits to manually aligning different operator configurations per model with different runtime constraints per chip. NetsPresso®, which we introduce today, was built to solve precisely this problem.
Building an Optimization Pipeline with CLI
From Model Registration to Binary Extraction, All in One Place
NetsPresso® is a platform that optimizes trained AI models into deployable forms for diverse target hardware, designed to be independent of any specific model framework or hardware. It addresses model size, inference speed, and precision simultaneously, with target runtime binary compilation handled within a single pipeline.
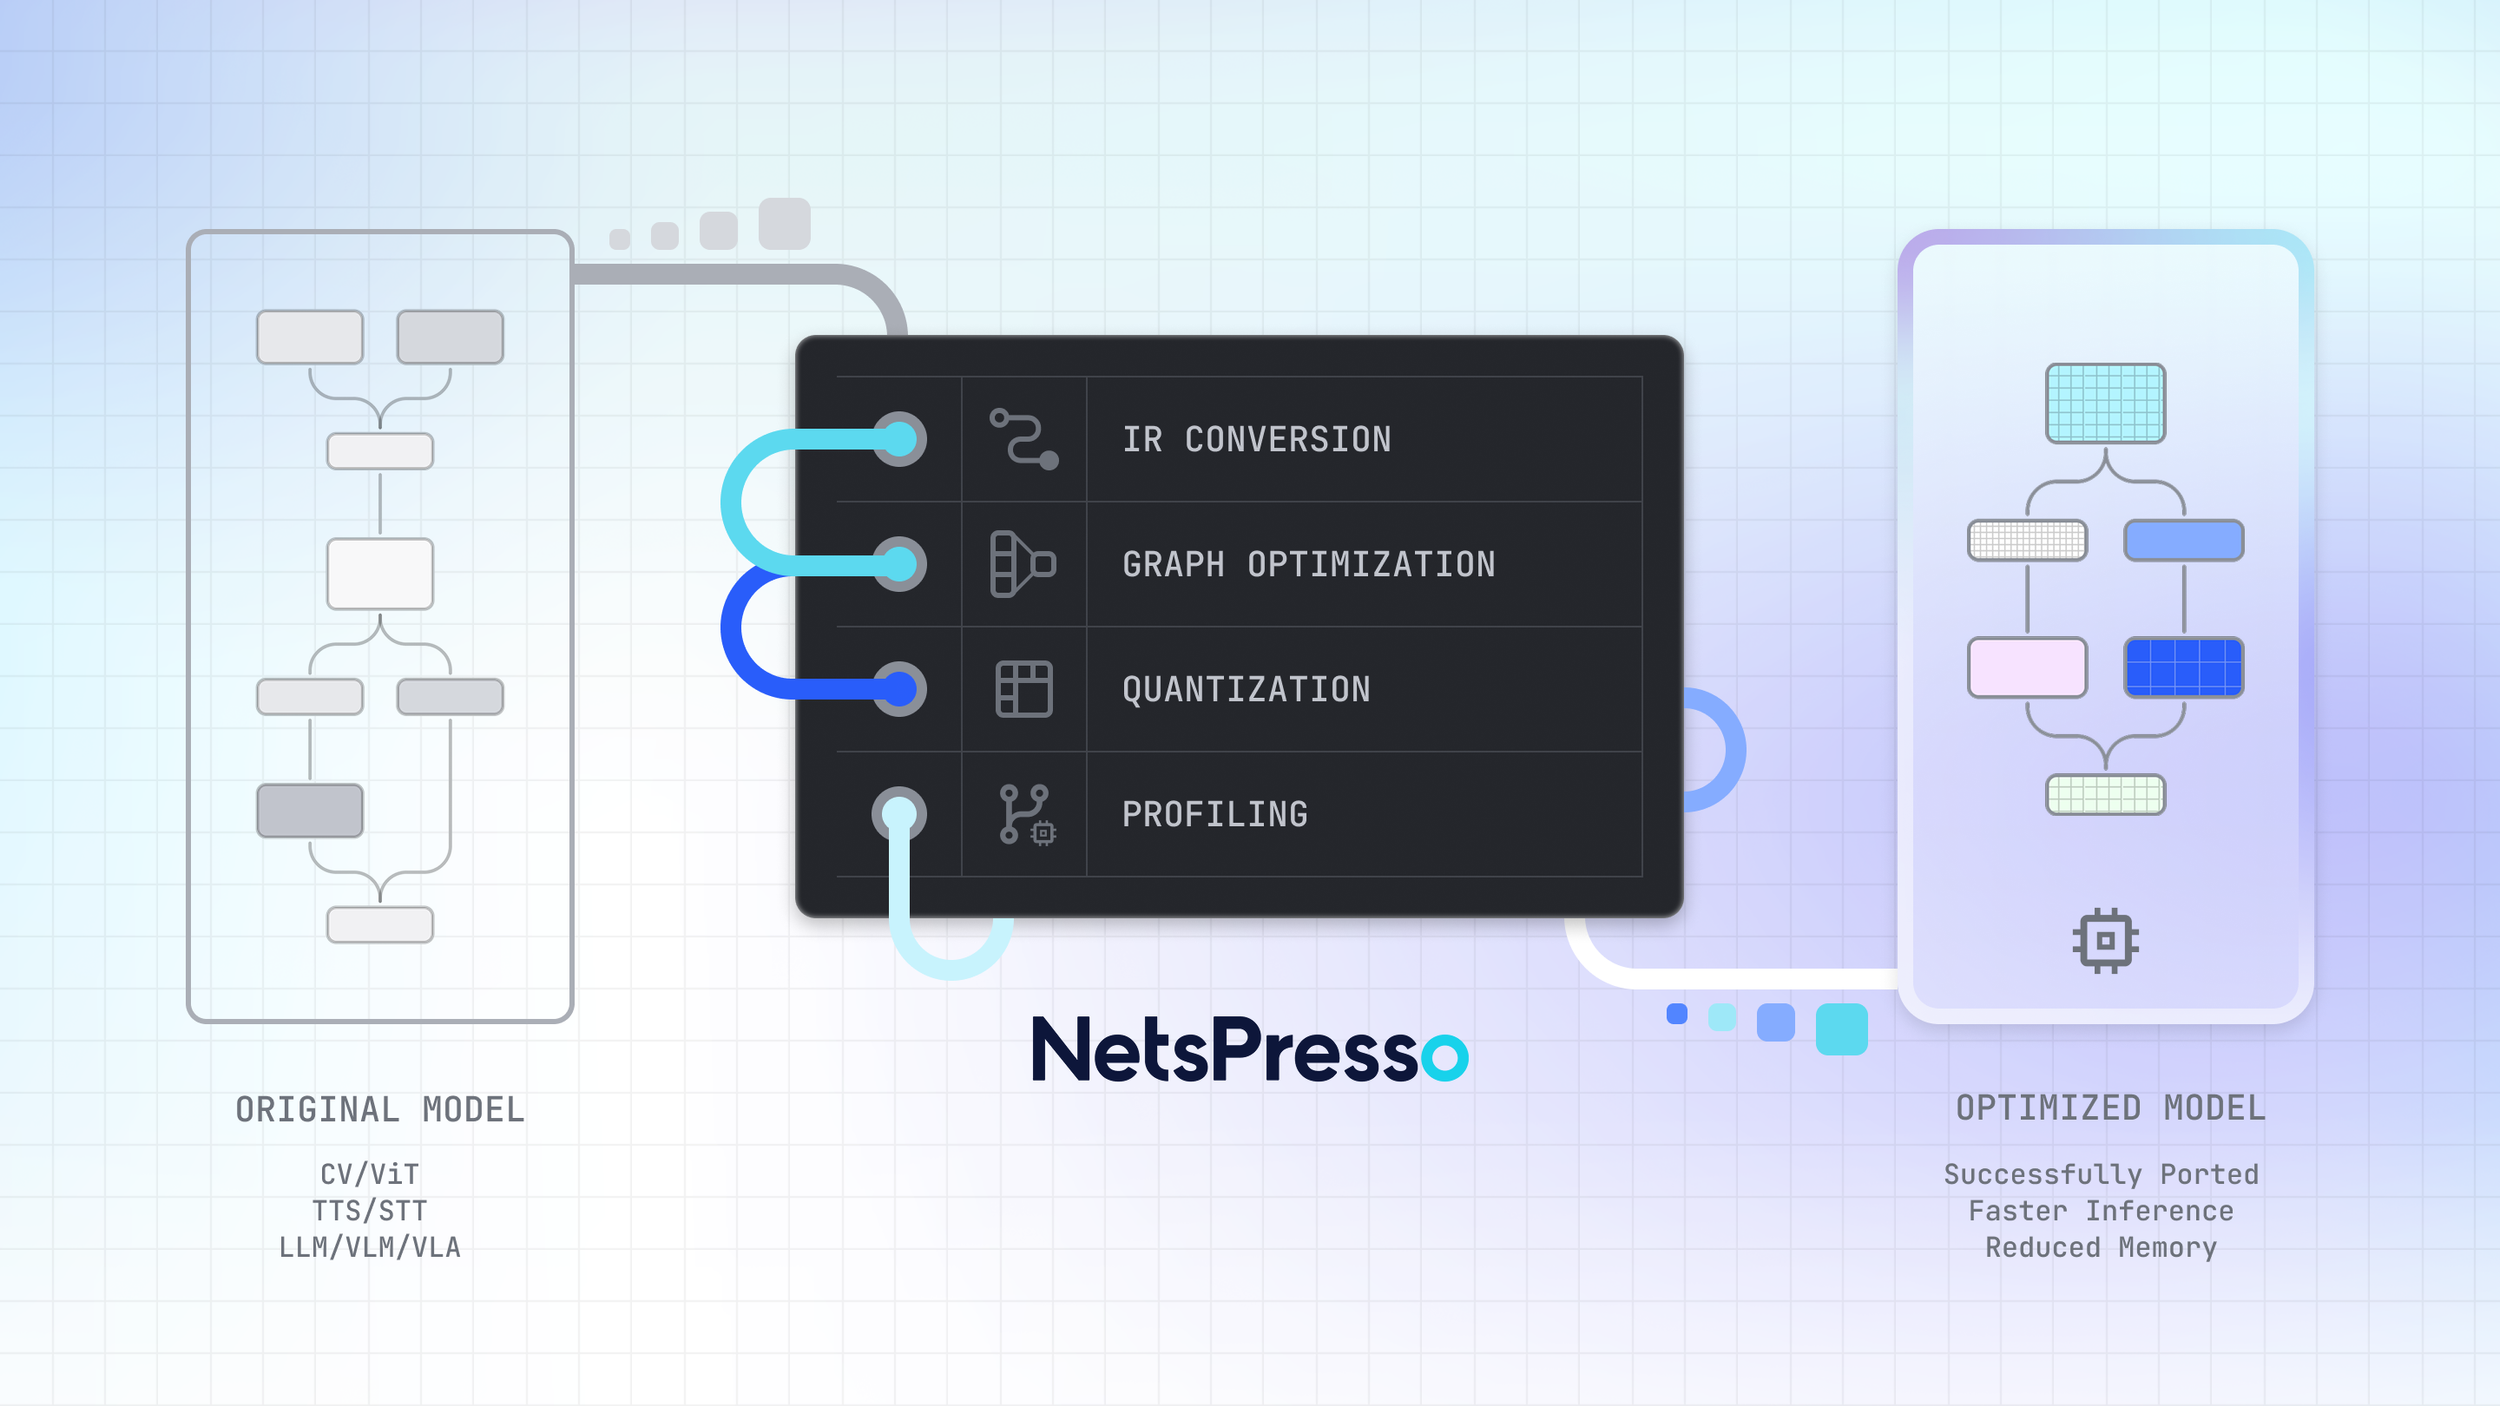
Figure 1: The NetsPresso® model optimization pipeline, from original model to deployment-ready output through IR conversion, graph optimization, quantization, and profiling.
Scenario: Deploying Llama 3.2 1B to an Edge Device
To illustrate, let us walk through a scenario.
Situation: Llama 3.2 1B needs to be deployed to an edge device.
Objective: Reduce model size and latency while maintaining inference accuracy.
Getting started is straightforward. Specify the model and target hardware, define the optimization pipeline, and run it.
$ np workspace init
# Create project: specify model, dataset, and target hardware
$ np project create --model llama3.2_1b --calibration-dataset llama3.2_1b-calib --device raspberry_pi_5_16gb --runtime executorch --backend xnnpack
# Create experiment: define optimization pipeline
$ np experiment create --steps aq, go, gq
# Run pipeline
$ np run
※ This example utilizes preset combinations pre-registered in NetsPresso®. The full list of supported configurations can be found in the NetsPresso® CLI.
YAML Configuration and Pipeline Execution
np project create locks a single model, a single device, and a single runtime combination into a project. Running np experiment create on top of this project generates YAML configuration files for three steps, aq (Advanced Quantize: model weight quantization), go (Graph Optimize: computational graph optimization), and gq (Graph Quantize: hardware-specific quantization), with quantization schemes, profiling settings, and evaluation criteria already populated. You can run with the default settings as-is, or open the YAML to adjust specific parameters. Below is an example YAML configuration.
steps:
- advanced_quantize:
algorithm: AWQ # Available: RTN, AWQ, AUTOROUND, QUAROT, SMOOTHQUANT, GPTQ
scheme: W4-A8_dynamic # Available: W4-A8_dynamic, W8-A8, W8-A8_dynamic
- graph_optimize: null
- graph_quantize:
scheme: W4-A8_dynamic # Available: W4-A8_dynamic, W8-A8, W8-A8_dynamic
automatic_mixed_precision: null # Available: GREEDY
profile:
- INPUT_MODEL
- ADVANCED_QUANTIZE
- GRAPH_OPTIMIZE
- OUTPUT_MODEL
evaluate:
- model: INPUT_MODEL
metric:
- PPL
- model: ADVANCED_QUANTIZE
metric:
- PPL
- model: GRAPH_OPTIMIZE
metric:
- PPL
- model: OUTPUT_MODEL
metric:
- PPL
LLM-specific settings (sequence length, KV cache, disaggregate) are included by default, reducing the initial setup burden. While this scenario utilizes a preset model pre-registered in NetsPresso®, custom models trained in-house can also be registered via np model register and follow the same workflow.
Running np run triggers NetsPresso® to convert the model into its own intermediate representation, NPIR (NetsPresso Intermediate Representation), and then execute the optimization steps defined in the YAML in sequence. Once optimization is complete, evaluation and profiling follow seamlessly. Evaluation compares accuracy before and after optimization, while profiling measures latency and memory usage on the actual target hardware. This entire process runs continuously within a single pipeline.
Reviewing Results: np report and np export
After the pipeline finishes, the first thing to do is review the results. Running np report summarizes the optimization results in a single table. Below is an example output.
※ The figures in the following report output are illustrative examples; actual results may vary depending on the model, hardware, and configuration combination.
At the final step (GQ), the results show a perplexity (PPL) of 31.30, latency of 3936.81 ms (approximately 67% reduction from the original), and memory usage of 448.42 MB (approximately 87% reduction). While PPL increased slightly compared with the original (27.63), memory and latency were reduced significantly. If the results meet requirements, np export can immediately extract a binary for the target hardware. Specifying the model and target, generating a single YAML, and running np run once: that is all it takes.
A single configuration produced the results. But is this the best outcome?
Automated Quantization Algorithm Comparison
One Configuration Is Not Enough: Compare Multiple Settings at Once
The results from AWQ quantization have been reviewed, but GPTQ might yield different accuracy, and applying Automatic Mixed Precision (AMP) can also significantly alter the outcome. Finding the optimal combination requires comparing multiple configurations, and repeating this process manually imposes significant time and resource overhead.
sweep: Declare Candidate Configurations and Compare Automatically
Instead of comparing manually each time, adding a sweep: block to the YAML allows you to declare all candidates at once and let the system explore them. For example, at the AQ stage you can split the comparison between AWQ and GPTQ as the quantization algorithm, while at the GQ stage you can combine variations with and without AMP. By listing candidate combinations in the sweep: block and specifying the best: criterion (PPL, latency, etc.), NetsPresso® automatically executes each combination and selects the optimal result based on the evaluation metric.
Running np report displays variant-by-variant results in a single table, enabling a clear comparison of how accuracy, latency, and memory change when only the algorithm and settings differ under identical conditions. You can select the combination with the highest accuracy, or sort the results by other metrics, for example with np report --sort latency, to prioritize latency. The purpose of automated exploration is not blind automation, but supporting evidence-based decision-making.
But what if you could also see why one result is better, and which layers account for the difference?
Model Optimization Visualization Tool
See Exactly Where Things Changed
NetsPresso® includes a built-in visualization tool called Probe. After automated exploration is complete, a single command in the terminal provides immediate access.
Running this command generates a visualization link that opens Probe. The model graphs before and after optimization are displayed side by side, showing which operations were fused and which layers were quantized. Per-layer SNR and latency distribution can also be reviewed, making it possible to understand at the layer level why the selected result from automated exploration is superior.
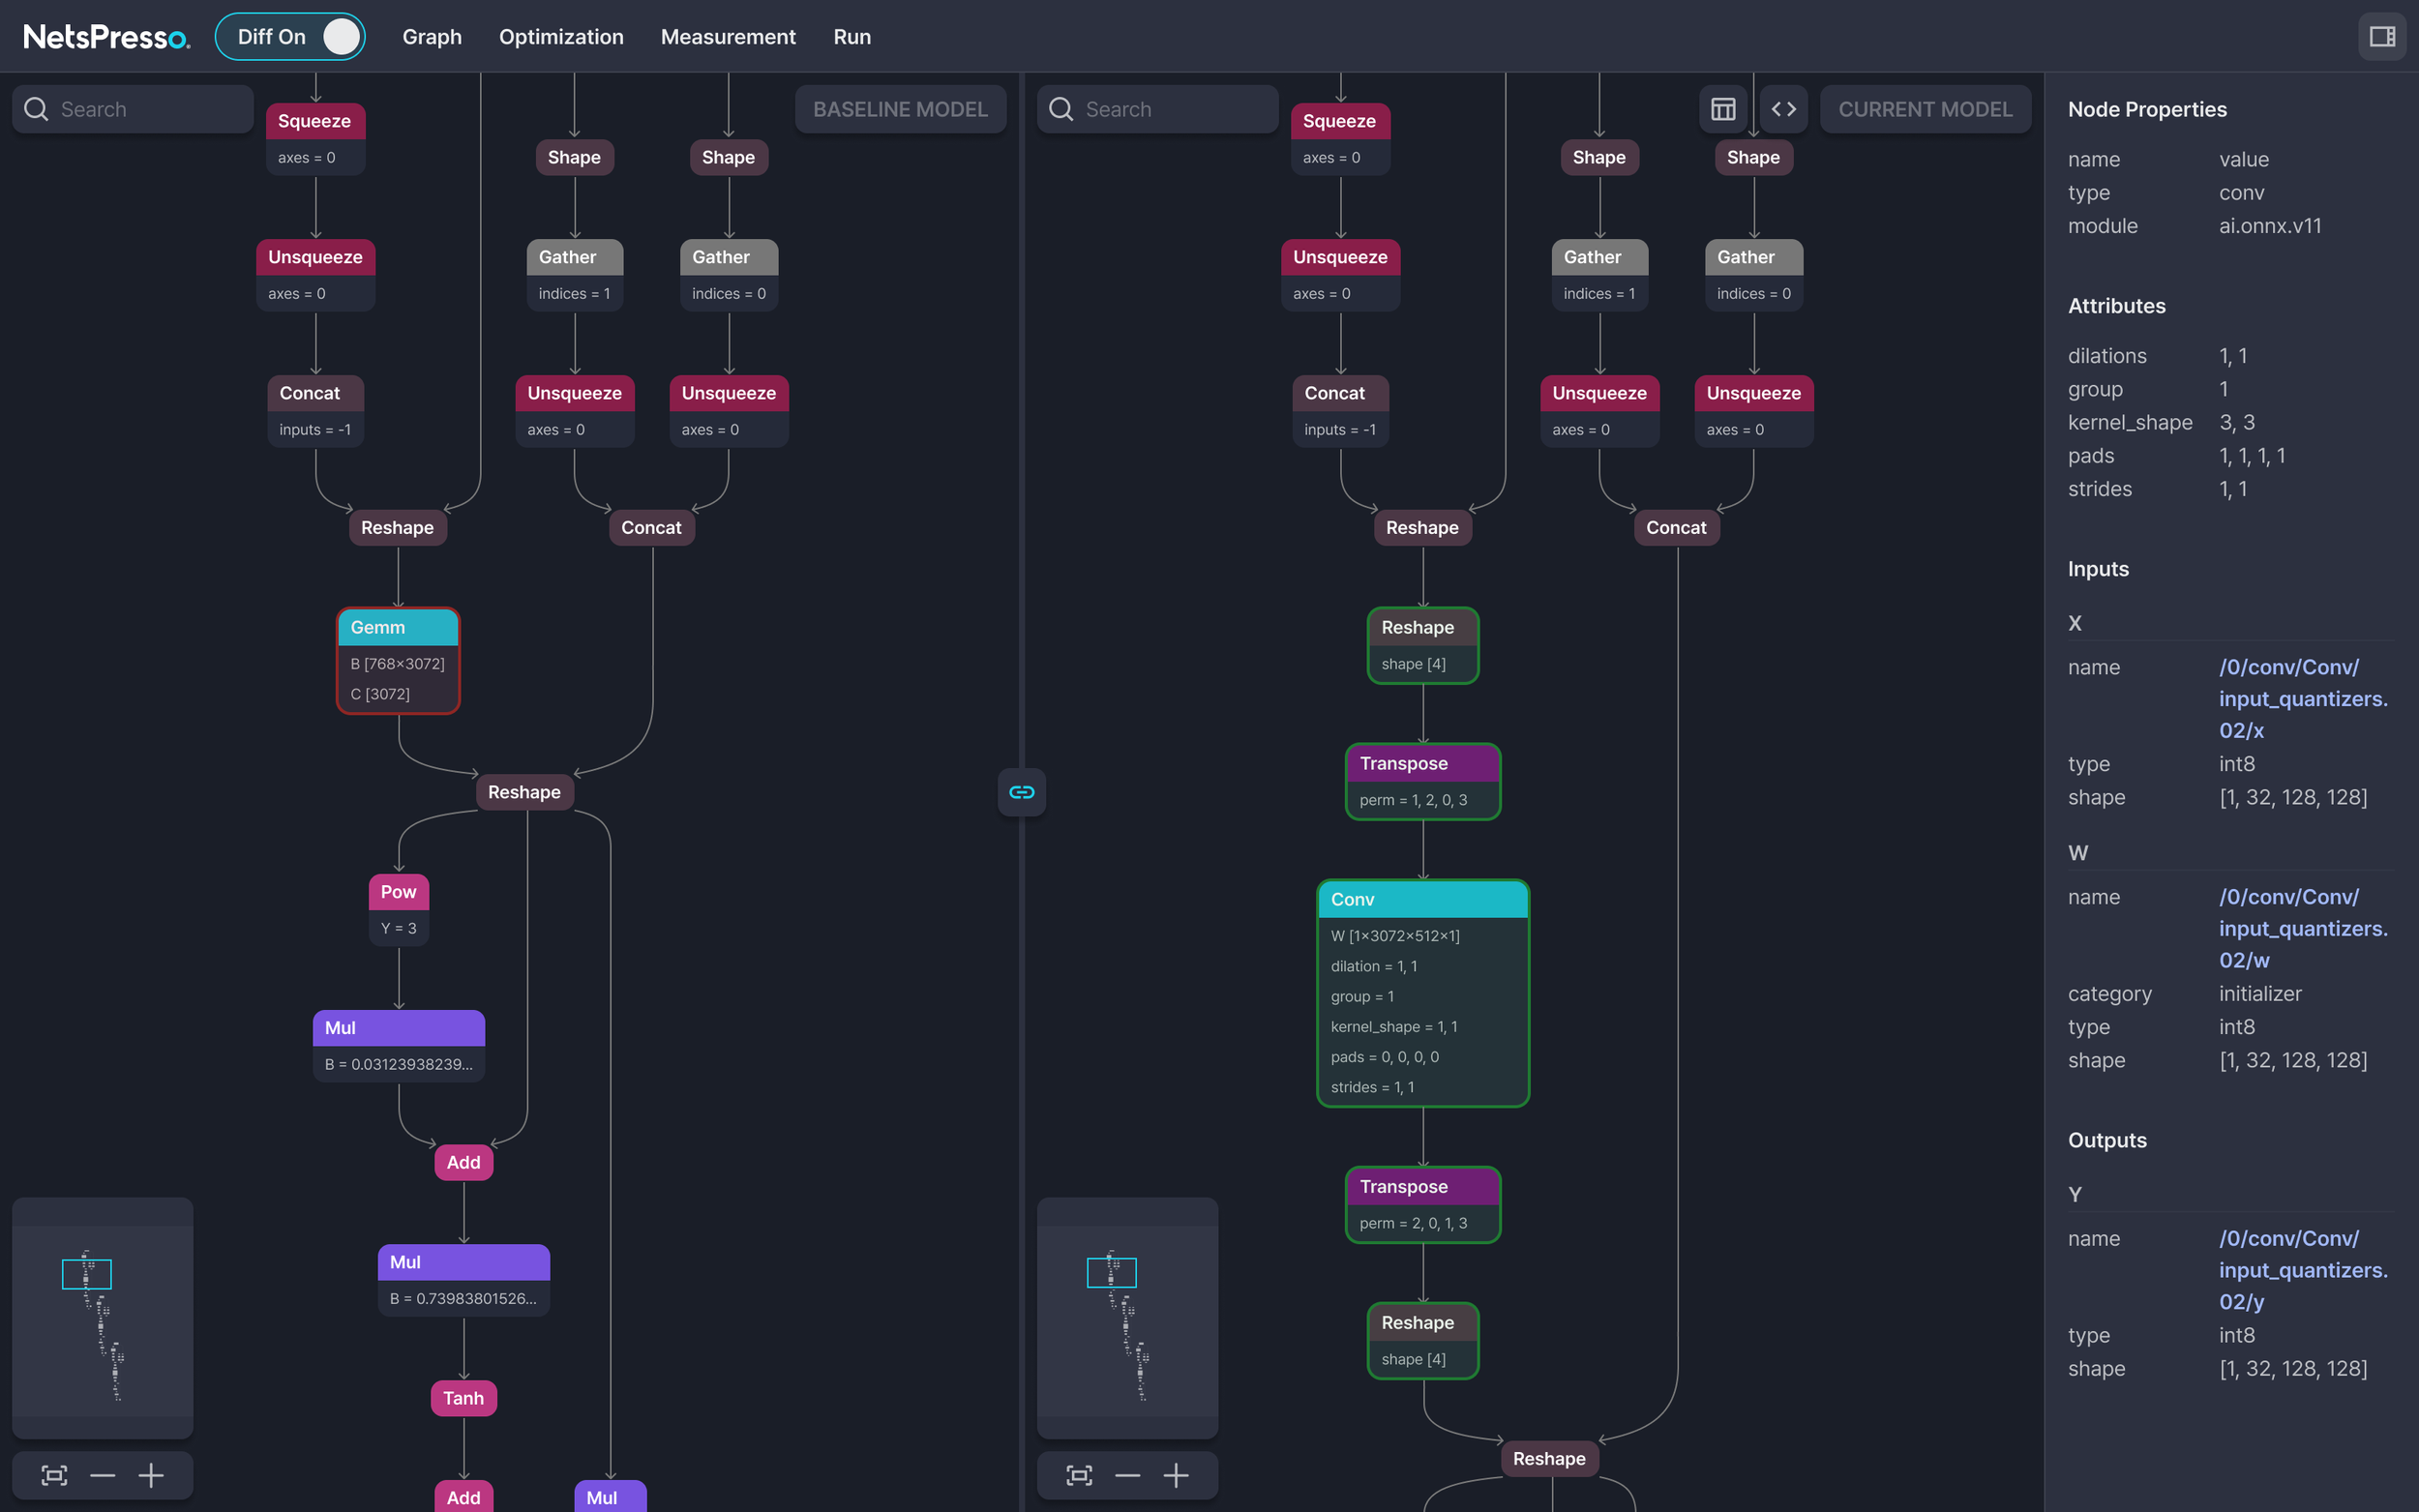
Figure 2: Side-by-side model graph comparison in Probe's Diff mode. Per-node properties and quantization details are shown in the right panel.
Looking back at the workflow so far, pipeline execution and automated exploration happen in the terminal, while result analysis takes place in the browser. NetsPresso® calls this workflow Cross UI, a structure that connects the execution power of CLI with the intuitiveness of GUI within a single platform. There is no need to install separate tools or transfer result files; everything from execution to visual verification flows seamlessly.
Coming next: Dashboard An upcoming update will introduce a Dashboard for comparing multiple experiment results via scatter plots. This will structurally support the iterative cycle of Probe diagnostics → configuration adjustments → re-experimentation.
NetsPresso® Deployment Environment and Compatibility
Your Existing Infrastructure Works As-Is
The natural next question is whether this can actually be adopted in your environment. NetsPresso® is designed to run across a variety of infrastructure setups.
GPU is not required. The optimization pipeline can run on CPU alone, even without a GPU environment. If a GPU is available, it can be specified with the --gpu-device option, and multi-GPU configurations are also supported.
Available as both a Docker image and a Python library. You can get started immediately with a Docker image without any environment setup, or install via pip install in an existing Python environment.
Models never leave your environment. NetsPresso® can be used in on-premise environments. Models and datasets remain in the user's local paths, and NetsPresso® only references those paths. The only data stored in the workspace is metadata (JSON configuration files). Even in environments where model exposure is not acceptable, existing security policies can be maintained.
Target devices range from edge to server. From mobile and edge devices to server GPUs, major runtimes and hardware are supported.

In the next installment, we will look at what happens inside the pipeline. We will open up the architecture of NPIR and the three-stage optimization engine (AQ, GO, GQ).
If you have any further inquiries about this research, please feel free to reach out to us at following email address: 📧 contact@nota.ai.
Stay ahead with Nota AI on LinkedIn. From edge AI trends to the latest tech updates — subscribe to Edge Insights and be the first to know. 👉 Subscribe nowFurthermore, if you have an interest in AI optimization technologies, you can visit our website at 🔗 netspresso.ai.