Building an Efficient ‘Hardware-Aware’ Object Detection Model in Under 10 Mins
Author Profile

Dr. Varshita Sher
Dr. Sher is currently working as a Senior Data Scientist, leveraging deep-learning technology to solve problems in the NLP and Computer Vision domains. She has a Master’s degree in Computer Science from the University of Oxford and a Ph.D. in Learning Analytics from Simon Fraser University. Her work in the last eight years has focused on the intersection of research and implementation of AI/ML algorithms in myriad sectors, including Edtech, Fintech, and Healthcare. Passionate about AI democratization, she continues to conduct AI/ML workshops for early-career researchers and write technical blogs to promote knowledge-sharing within the data science community.

Medium
More written by Dr. Sher is posted on Medium. Please click on the image to connect to Medium immediately.

Dr. Sher's Twitter is quick to find out what she's updating. Please click on the image to connect to Twiter immediately.
What are hardware-aware models?
Often times when data scientists think of an optimized model, they think in terms of one or the other metrics — such as accuracy, precision, recall, etc. In other words, efforts are made to ensure every last bit of accuracy is squeezed out of the training set by tuning the model architecture, applying regularization techniques, preprocessing datasets, or a combination of all of the above.
Experienced data scientists may take it one step further and examine an optimized model in terms of its inference speed by analyzing its computation complexity, often measured using FLOPs (floating point operations). The lower the FLOP, the better the inference efficiency (i.e. the amount of time it takes for the model to run inference on the incoming batch of data). However, merely improving FLOPs is not a guarantee that we would end up with a low-latency neural network because a previous study has shown models with similar FLOPs can have different inference speeds.
While these are perfectly good lenses to view an optimized model, there are other things equally (and possibly more) important. Imagine this for a moment, what happens if your super-awesome large language model (LLMs) suffers from low inference latency when deployed on an edge device? Or worse, can’t even fit into the memory of the device at the time of deployment?
This is where hardware-aware models come into the picture!
Hardware-aware models solve memory constraints at time of deployment. When designing optimal neural networks, they take into account both network architecture (i.e. # of trainable parameters) and target hardware characteristics whilst guaranteeing inference efficiency.
The need for hardware-aware models is now more than ever, especially since there has been a massive influx of emerging smart devices that are equipped with very diverse processors, such as GPUs, VPUs, and various AI accelerators that have fundamentally different hardware designs. Given that the intent behind training any model is to deploy it in production, it becomes even more important to cater to different target devices.
Let’s see them in action!
How to build hardware-aware models?
In this tutorial, we will be using Nota.Ai’s NetsPresso platform to build an object-detection model. All you need is the internet and a browser! Go ahead and sign up to create an account and receive 500 credits to work through this tutorial.
Because it’s a cloud-based service, you can train your model on their website and export it in a format suitable to the target device — for instance, Raspberry Pi — when finished. Without having in-depth knowledge of machine learning, you can start with NetsPresso to create a basic object detection project, like teaching an AV (autonomous vehicle) to detect stop signs, pedestrians, and other vehicles or a scan-and-go handheld device that automatically identifies groceries in a supermarket!
Once you have uploaded your dataset, you can start developing the training model and assessing its results with a few clicks. You can then test the final model to see if it detects all relevant objects in a never-seen-before image. Upon completion, you can either export the trained model (say, for the Pi) or upload more images and further train the model.
Currently, NetsPresso is a low-code platform that provides a GUI interface. In future releases, API and CLI interfaces will be provided.
Quick platform tour

Figure 1: NetsPresso Platform
When you first sign in, this is what your account would look like. It provides three main functionalities:
Model Searcher — To search for an optimized model based on the target device where the model would be eventually deployed.
Under the hood, it uses Neural Architecture Search (NAS) to accomplish this. In simple terms, NAS takes away the guesswork that comes with manually defining the depth and width of your neural network as it automatically selects the best neural network architecture based on your specific hardware and architecture needs.Model Compressor — To allow the building of lightweight models.
Under the hood, it uses pruning and filter decomposition to reduce the number of trainable parameters.
Fun fact: You can even upload one of your own Pytorch or Tensorflow models to avail of the compressing facilities within the platform. The formats currently supported include onx and tensorflow-keras (.h5, .zip).Model Launcher — To allow packaging of the model for deployment on the target device, Linux server, as a pip wheel, etc.
If you click on Model Searcher in Figure 1, it will take you to the hub for all your future models, i.e. this is where all models sit. You’ll notice that the platform comes pre-installed with a few models for popular ML tasks like object detection and image classification.

Figure 2
On the left pane, clicking on Datasets will allow you to see the pre-installed datasets. Feel free to use one of them for creating a new project (see Create a New Project button in the figure below) or simply browse through it (by clicking on the See Details button).

Figure 3
To give you a sense and feel of how to work with your custom data, we will be creating a new dataset and manually uploading train, test, and validation sets.
Getting data in the right format
Prior to using the NetsPresso model searcher, the data needs to be organized into a specific format. There are three supported formats for the ‘object detection’ task. These differ mainly in the way in which directories — including images and their corresponding labels — and structured:
YOLO format

Few things to consider:
The
.txt files contain the information about bounding boxes i.e. x and y coordinates of the objects in the image and the labels corresponding to each object. For instance:
{class number} {center_x} {center_y} {width}  {height}
0                0.415730 0.494949   0.394864 0.8282830
0                0.659711 0.476010   0.205457 0.6489900
0                0.848315 0.375000   0.229535 0.67424242
42               0.776083 0.356061   0.062600 0.161616
The .yaml file contains class information (i.e. name of the class — name and the total number of labels — nc) as follows:
names:
- aeroplane
- bicycle
- bird
- boat
- bottle
nc: 5
2. COCO format

Few things to consider:
Unlike the YOLO format, the COCO format prefers to have one .json file per folder (train, test, and Val) that contains all the relevant metadata (including class labels and bounding boxes). See below for an example JSON file.
{
"info": {
  "year": "2020",
  "version": "1",
  "description": "Random Object Detection Database",
  "date_created": "2020-12-09T20:07:57+00:00"
},
"categories": [
  {
    "id": 0,
    "name": "aeroplane"
  },
  {
    "id": 1,
    "name": "bicycle",
  }
],
"images": [
  {    "id": 0,
    "license": 1,
    "file_name": "example-1.jpg",
    "height": 720,
    "width": 1280
  },
  {
    "id": 1,
    "license": 1,
    "file_name": "example-2.jpg",
    "height": 720,
    "width": 1280
  },
],
"annotations": [
  {
     "id": 0,
     "image_id": 0,
     "category_id": 2,
     "bbox": [568, 321, 284, 247],
     "area": 70148,
  },
  {
     "id": 0,
     "image_id": 0,
     "category_id": 4,
     "bbox": [518, 221, 384, 407],
     "area": 32148,
  },
]
}
3. VOC format

Few things to consider:
This format requires one .xml file per image with the same file name. See below an example .xml file:
<annotation>
  <folder>VOC2007</folder>
  <filename>000001.jpg</filename>
  <size>
        <width>353</width>
        <height>500</height>
        <depth>3</depth>
  </size>
  <object>
        <name>dog</name>
        <pose>Left</pose>
        <bndbox>
                <xmin>48</xmin>
                <ymin>240</ymin>
                <xmax>195</xmax>
                <ymax>371</ymax>
        </bndbox>
  </object>
</annotation>
Note: If you need further assistance, check out the official COCO and VOC Data format.
Validating the data format
Once you have transformed the data into the desired format, a quick validation check needs to be performed to validate your dataset structure to use NetsPresso. Essentially, this will generate a certificate and zip files (for train, test, and Val sets) that we’ll need at the time of uploading the dataset on NetsPresso.

At the top, you will be able to find the instructions for Linux, Mac, and Windows users. Once you have downloaded the software appropriate for your operating system, open it and select the train, test, and validation dataset folder path.
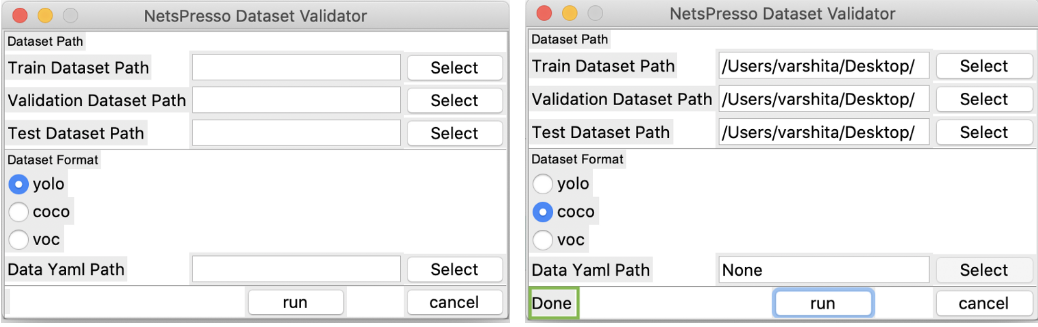
NetsPresso Dataset Validator — before (left) and after (right) a successful validation with a Done highlighted in green.
Note: When you hit Run, it will ask you to select an output directory path. This is where five files will be created — test.zip, train.zip, val.zip, validation_key.np, data.yaml — all of which will be needed at the time of uploading to the NetsPresso platform. Let’s see how to do that in the next section.
Uploading the dataset
In Figure 3, click on Upload Dataset at the top. After you have specified details such as the dataset name and a short description, select the Object Detection task from the list. Finally, upload the dataset splits — along with .yaml metadata and .np certificate from the output directory path described above — by clicking the Start Upload button at the bottom right corner.
Note: The upload process might take a couple of minutes.
Training the model
Post successful completion of the uploading process, you can inspect the dataset in a tabular format by clicking the See Details button.
To start building a model, click on the Create a New Project button.

A prompt will appear, make sure you select the Quick Search option.

Finally, we will proceed with inputting some basic information such as the project name, and project description (i.e. memo), selecting the task as Object Detection, and picking the dataset from the drop-down menu.

Quick Search platform in NetsPresso
Note: At this moment, NetsPresso is a computer vision-focused platform that only supports detection tasks. In future releases, however, it will support additional functionality such as classification and segmentation (grayed out in the image above).
Selecting Target Device
The platform currently supports three target devices — NVIDIA Jetson, Raspberry Pi, and Intel Xeon — corresponding to three popular machine learning frameworks — TensorRT, TensorflowLite, and OpenVino.
TensorRT — a machine learning framework developed by NVIDIA that is optimized to run on NVIDIA GPUs and typically accelerates GPU inference speeds.
TensorflowLite — a machine learning framework developed by Google for deploying models on mobile, microcontrollers (MCU), and other edge devices.
OpenVINO — a machine learning framework developed by Intel to optimize inference on CPUs and VPUs.
These initial choices of devices were based on market and user research that revealed NVIDIA Jetson Family and Raspberry Pi series are very popular for making Edge AI solutions (for instance, check out Raspberry Pi Face Recognition Door Lock and Cucumber Sorting Arm).
Overall, the currently available target devices on the platform are a good mix of various devices CPU/GPU & low-spec (for edge)/high-spec (for cloud). For the purpose of this tutorial, we will be selecting Intel Xeon W-2223 with OpenVINO framework.
In the future iterations, the user will be able to choose from a wider assortment of devices including Arm Virtual Hardware, NVIDIA Jetson Orin (recently released by NVIDIA), Renesas RZ series, low-spec MCUs for embedded systems, AI accelerating devices (NPUs), and many more.
Additional Settings
We will be selecting the output datatype’s precision as FP16 (which will be faster compared to FB32 given the low memory footprint, although network accuracy might be better with FB32). Finally, we set the batch size as 16, target latency as 1000ms, and image size as 640x640. To proceed, hit the Next button.
Note: For experienced data scientists, there are also options to set training epochs, hyperparameters (such as weight decay, learning rate, etc), and data augmentation techniques (such as cropping, rotating, zooming, etc).

Advanced options for hyperparameter tuning and data augmentation.
Model Recommendations & Training
Based on our hardware, image size, and latency requirements, we will be presented with some options for relevant models (in our case, these will be variants of the YOLOv model which is the state-of-the-art for object detection).

Feel free to pick one that suits your needs and hit Next (I will be picking YOLOv5m). Next, select the default NetsPresso server and click on Start Project.
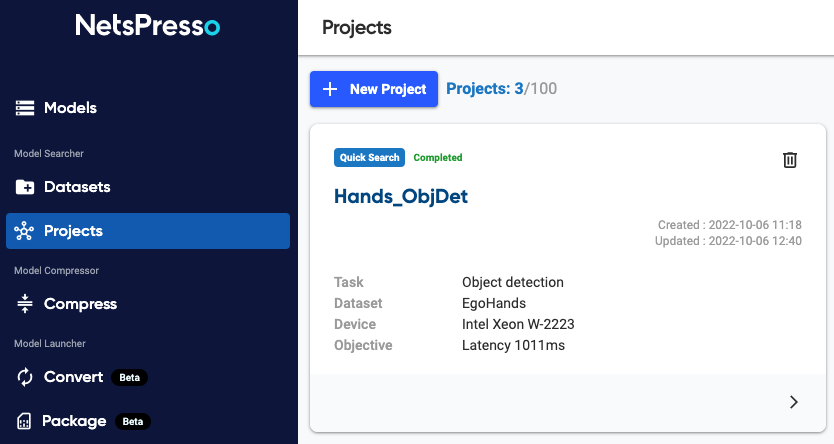
The training might take a few hours, depending on the hyperparameters set previously. Upon successful completion, you should be Completed in green on the model card. Click on the small arrow on the bottom right to inspect the model results.
Evaluation Metrics
mAP (mean average precision) is a popular choice of metric for measuring the accuracy of object detection models.
In essence, it captures how well the predicted bounding box overlaps with the actual bounding box for an object in the image aka IoU (intersection over union) — the higher the IoU, the better the prediction. The IoU is 0.0 when there is a 0% overlap between the predicted and ground-truth boxes. The IoU is 1.0 when the 2 boxes fit each other 100%.

Source: PyImageSearch
To check the results, simply head over to the Result tab (highlighted in purple below). With a total of 90 minutes of training, our model was able to achieve a nearly perfect mAP (99%) on the test set (with an IoU threshold of 0.5 for each class). Given that the mAP metric is dependent on the IoU threshold, a more reasonable approach for evaluating the model is to consider the mAP score calculated using a set of IoU thresholds from 0.5 to 0.95 (~80%).

Visual Inspection of the Test set
One of the best features of the platform is the ability to manually inspect the predicted bounding boxes for each object in the image — without writing any piece of code. To do so, one simply needs to head over to the Testing section (highlighted in green below).

Visual Inspection of object detection results on the test set
As we can observe, all the hands detected by the model in an image have been highlighted in one of five colors — corresponding to the label of the detected hand (yourright, yourleft, myright, myleft, and hands).
Next steps
Congrats on training your first ever object detection model without writing a single line of code!
From here on, the platform offers a few different choices for the next steps. You can either:
Package model as pip wheel by selecting New package in the figure below.

Create NetsPresso whl package
Note: Follow the instructions here for further details.
Convert the model for different hardware, for instance OpenVino → Tensorflow Lite (say, for deployment on a Raspberry Pi) and retrain the model. To do so, head over to the Models section in the left panel and select the Convert option.
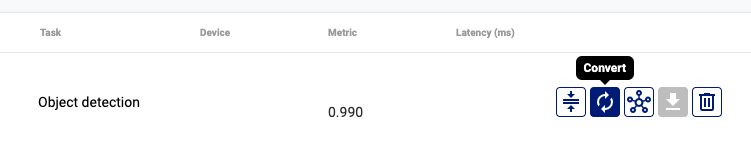
Convert the model to different hardware
Make the model lightweight by compressing it. To do so, head over to the Compress section in the left panel, select the Compress option and pick one of the two compression techniques.

Compressing the model

Choice of compression techniques
About the company
NetsPresso® is a newer platform in the deep learning scene. It is the brainchild of the team at Nota AI which was founded in 2016 with the vision of making machine learning accessible to all. Apart from the hardware-aware optimization platform, they also support Intelligent Transportation Systems (ITS) and Driver Monitoring Systems (DMS).
For more information, contact the team at netspresso@nota.ai.